Showing posts with label sewing. Show all posts

Saturday, August 21, 2010

Limp Leather Binding - Black

This was another sewing variation I tried. This technique requires signatures in multiples of three. Rather than adding an additional piece of leather to wrap around, I added a leather button.
This is the end result.

Tuesday, August 17, 2010

Limp Leather Binding - Teal

This summer I have been working on hand outs to use for teaching workshops. One of which, is for a limp binding. I researched some new sewing variations for the hand outs. This particular variation requires the number of signatures to be in multiples of three.
 As can be seen from my sewing card, you need access to all three signatures at the same time. To achieve this, I used clips to keep the two outer signatures in position, and rubber bands to secure the middle signature.
This is the end result.

Tuesday, August 3, 2010

The Bone Folder

The Bone Folder is a recorded conversation between a bibliophile and master book binder from 1920"s Germany. My book binding instructor translated the text from it's original German, and gave me a copy for binding. I chose to covering it in a paper case because the text block was small, and this binding style is briefly discussed in the text.
The text block was sewn with two pieces of card for end sheets. The paste paper is folded around the card for support. This is an adhesive free binding, so the paper could be easily removed and the text block rebound if desired. If the cover was folded out, this is how the book would look.

Monday, June 28, 2010

Pamphlet Repair

This pamphlet was originally housed in a pamphlet binder. The binder was old and acidic.

The pamphlet had been attached to the binder with a book cloth hinge. The first and last pages were still attached with this hinge, but the rest of the text block had broken away.
The first step was to remove all the pages from the binder. I cut the attached free using a scalpel. Next, I removed the book cloth. I was able to peel it off dry because the adhesive had deteriorated. Then I guarded the loose pages together using heat set tissue, and resewed the pamphlet. Finally, I rehoused the object in an archival envelope.

Wednesday, May 12, 2010

Tape Removal - Music Book

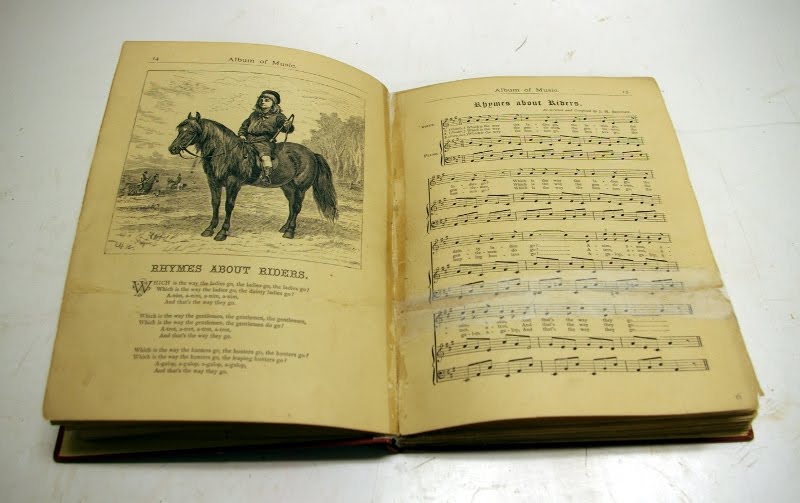
This book's sewing had broken in several places and the signatures were being held together with pressure sensitive tape. The case was detached, but in good shape.
I began by removing all the tape with a tacking iron and spatula. In several areas, the plastic carrier from the tape had dried and fallen off, leaving behind only the adhesive residue. I was able to remove most of this using ethyl alcohol and a cotton swab. When I had all the signatures loose, I washed the book between Reemay. First, in more alcohol to help reduce the tape staining and open the fibers. Then in water twice and Magnesium Bicarbonate [Mg2(CO3)2]. These pictures show the water washes one (top) and two (bottom). As you can see, a lot was removed.
When the sheets were dry, I guarded the loose leaves back together and repaired damaged pages with Japanese tissue and heat set tissue. Then I resewed the text block (two on) and lined the spine with Japanese tissue and linen. I repaired the case by lining Japanese tissue behind the original spine and adding a blotting paper stiffener. I also put PVA in the bumped corners and more Japanese tissue on the corners and endcaps, where the cloth was damaged. I rehung the boards using the linen spine lining, then covered the hinge with a strip of Japanese tissue. These are pictures of the end result.

Wednesday, May 5, 2010

Leather Reback with Previous Repair

I picked this book off the cart because it had a lot of previous repairs. The sewing had broken and the text block was in two pieces. The sections closest to the break were being held in place with pressure sensitive tape. Being a tight backed book, the spine had also broken. The book was being held together by what looked like maroon duct tape. This tape was also on a few pages in the first section. There was also approximately ten pages of images, which had be cut down and taped together, in a random order, with pressure sensitive tape behind the title page.
I began be removing the tape from the spine. The adhesive was delaminating, so it peeled off easily, but did leave some residue on the leather. Next I removed the pressure sensitive tape from the pages of the text block with a tacking iron. I repositioned the now loose folios, cleaned the spine, and lined it with Japanese tissue and linen. Then I repaired the sewing at the break.
I worked on the images while my spine liners were drying. I removed the tape from all the images and lined the sheets with heat set tissue. The images were on single sheets, which I collated and guarded together. Then I tipped them on to the front of the text block with a thin strip of Japanese tissue.
Then I lifted the leather on the cover and attached the text block via the linen. I constructed a new spine piece from linen lined Morike and added a 10 pt board stiffener. I attached this under the leather, the glued the leather back down. Finally, I put some PVA and Japanese tissue on the corners to reshape them, and covered the linen hinge with a strip of Japanese tissue (paste).

This book was an experiment in toning techniques for leather. I toned the new spine piece prior to attaching, and I tried to stipple a variety of hues to better match the leather. My colors were a little light for this book, but overall I was pleased with how it looked. I plan on trying this technique again on other books.

Thursday, April 29, 2010

Recent Projects

These are two books I have treated recently in the lab. Unfortunately, I got ahead of myself with these books and did not take before images.
This book was a half leather reback. The text block was a group of pamphlets sewn together and one section was exceptionally brittle. Initially, I tried to tip in the loose pages of this section with paste, but it was unsuccessful. It had to be removed from the group, washed and deacidified,  then guarded and resewn into the text block.
After the text block was repaired, I repaired the case and reattached it as seen in my previous entries. This is the completed book.
This book originally had fake raised bands, so I decided to mimic that when I rebacked it. Before cleaning and lining the spine, I made a template of the band positions. To make the fake raised bands, I glued two pieces of leather together and cut them into strips of the appropriate size. Then, using the template, I positioned the strips on the new spine stiffener. This was good practice, but because the leather was rotting 19th century leather, nothing was gained by saving the spine pieces. This process should be reserved for either better quality leather or a more valuable book. This was the end result.

Friday, April 23, 2010

Cook Book

A good friend of mine inherited this cook book from her aunt, in this condition. It is a little dated with some of the recipes, but she claims it also contains priceless ones. Looking for a new project to tackle, I offered to repair it for her. The covers were totally detached, the endpapers were falling off the boards, and the first section and the last two pages were in pieces. (The middle image shows the first section's pages and the bottom is the last page of the index. This is also the page missing the most information).
I began by flattening and repairing the damaged pages. I lined them with heat set tissue, and added additional tissue to the fraying edges. The first pages of the first sections were missing, so when the pages I had were repaired, I guarded them to pages of Dove Grey to complete the section. I also made new endpapers from Dove Grey. Next, I cleaned the spine, repositioned the sections, tipped on the last two pages with paste, and lined the spine with Japanese Tissue. Then I put the first section and end papers in place and put the book in the press. Then I lined the spine again with linen. Once that lining was dry, I sewed on the endpapers, the first section, and repaired the sewing for the sections in the middle which needed it. Then I slightly rounded the spine and lined it with a heavy weight paper to help hold the shape.
Then I made a new spine piece from linen lined Morike, complete with 10 pt board stiffener. I lifted the cloth on the covers, positioned them on the book and carefully moved it to the press. Next I attached the new spine piece to the covers, glued down the turn ins, and then cased in the text block via the linen and new endpapers.
Finally, I did some Japanese tissue repairs on the cover and toned the new spine piece to match with acrylics. (The middle image shows pages from the first section and the bottom is the last page of the index).

Thursday, March 25, 2010

Wet Cleaning and Report

I was going through my old pictures and realized I had not yet posted any wet cleaning of books. Since this particular book belongs to me, I wrote a treatment report for it. I will post that with pictures instead of the usual format.

Treatment Report

Title: Alice in Wonderland – Carroll        Date Completed: August 2009
Format: Book
Material: Cloth                                     Time:  28 hours
Binding: Full

Condition:
Text block was originally perfect bound, but the adhesive had delaminated in spots, causing the text block to be split into several “sections.” The text block was completely detached from the front cover. Pages were yellow with acid and incredibly brittle. Almost every page was torn or creased, with pieces missing. A few pages were missing entirely. Covers were in surprisingly good condition, with the exception of a piece missing from the spine. There were a few cracks in the cloth, but the spine was still attached, joints were not too worn and corners were not bumped.

Treatment:
Pages were separated from text block on by one and placed between sheets of Reemay. Once all the pages were separated, they were soaked in cold, filtered water for 20 minutes. The initial pH of the paper was 3.5, so after a water bath, the pages were soaked in Magnesium Bicarbonate [Mg(HCO3)2] for an additional 30 minutes. The pages, attached to the Reemay, were then hung to remove excess liquid, pressed between blotting paper, and dried on the drying rack. The pH after washing was 6.5. Once dried, all pages were aligned and inspected for damage. Missing pages were replaced with acid-free Dove Grey paper and repairs were made with heat-set tissue. The pages were then divided into signatures of six and guarded with Japanese tissue (via wheat starch paste). When all sections were attached (sewn one on) and aligned, they were nipped in the press to reduce swell. Using pre-punched holes, the text block was sewn with tapes. A toned, linen lined, handmade paper endsheet was sewn in to replace the missing endpapers in the front. The spine was then lined with Japanese tissue (via wheat starch paste), head and tail bands were attached, and then the spine was lined with linen (via PVA) and rounded. The endsheets were lifted on the covers, and the original spine lining was removed, and then replaced with Japanese tissue and 10 pt board. The text block was re-attached to the boards by gluing the tapes and linen down under the lifted endsheets. The missing piece on the spine was replaced with Morike and toned with acrylics. The small cracks in the cover were repaired with Japanese tear strips, and also toned.

Notes: 
Despite de-acidification, the pages remained terribly brittle. Some pages tore slightly during sewing, and it reached the point where continued repair with heat-set tissue was not worth the value of the book. Had this been a more prestigious book, the pages might have been individually lined with a very thin Japanese tissue for support. But this particular book was not worth such efforts.


Images:

These images show the book before treatment. Notice the breaks in the text block.
This is a pictures show the washing process, including the initial submerge in the bath (top), the amount of acid washed out with soaking (below), and a method of hanging the leaves to dry (bottom).
These are after images. I received a lot of brownie points for getting the text block back in the case without rebacking it. I was just lucky, considering I had to guard every folio for sewing.

Saturday, February 6, 2010

Limp Leather Long Stitch Binding

I was recently given some upholstery leather and wanted to find a way to use it. The leather was chrome tanned. This means the leather would be incredibly difficult to par and it's best use would be limp bindings.
To prepare the leather for a limp binding, I lined the back with paper and pressed it to ensure it dried as flat as possible. When I removed the leather, I noticed it had puckered in places from the paper shrinking. Fortunately I was able to fix this by rolling the leather. This unified the puckering and had a nice textual effect, which only worked because the leather was run through a machine at the upholstery factory. I gently sanded the leather to enhance the texture. Next, I trimmed the leather to the height I wanted, leaving the fore edge a little longer to trim later. Then I creased the area for the spine with a bone folder and cut slits for the sewing. Finally, I attached the text block and trimmed the fore edge. This is the end result (2010).