Showing posts with label bone folder. Show all posts

Monday, August 9, 2010

Ranke Rebind

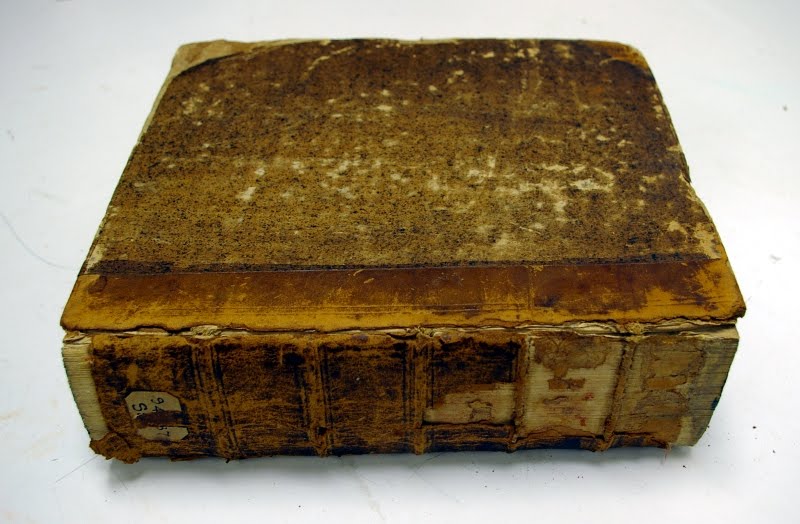
I found this book in the Ranke collection, in Special Collections at Syracuse University. Both joints were broken and the boards loose. The leather was missing at the corners and what remained appeared to be only the flesh side. 
 
 
I soaked the front board in a warm water bath to float off the original book plates. While that soaked, I scraped the old leather off the spine with a cobbler's knife. I covered the spine with methyl cellulose to remove excess glue or linings. Then I lined the spine with Japanese tissue and linen, and added new end bands and end papers.
I cut new boards, and sanded them down to fit against the shoulder. I attached them to the text block with the linen lining. Then I cut a new piece of leather for the spine, and parred the edges. I attached this leather to the spine with paste, as a tight back. After gluing down the turn-ins, I constructed head caps and pressed the book overnight.
Once the new leather was set, I trimmed what overlapped onto the boards and then infilled the board with 10 pt. Next, I covered the board with paste paper, overlapping slightly on the leather. When the paste paper was dry, I trimmed the turn-ins and infilled the inside of the boards. Finally, I glued down the end papers and reattached the original book plates with paste. This was the end result.

Monday, July 5, 2010

Tissue Repair on Leather

This particular book's joint was broken and the spine was loose. It also had damage to both end caps. I repaired these areas with Japanese tissue. Unfortunately, I was working on a group of seven tissue repairs and did not take "before" pictures. Because the leather was also deteriorating, I coated the entire book with Klucel G. This picture shows the book before toning.
I was very lucky because the color of this leather was easy to match. For this reason, I decided to tone the areas of deteriorated leather between the gold stamping. After doing this, I applied SC 6000 wax to the areas treated with tissue, to add shine and create the appearance of leather. This is the end result.

Wednesday, June 23, 2010

German Springback

I have made one German style Springback before, and decided to make another, smaller one. Following these instructions, I made this.
 Note: Because my Springback was bound in leather, not only did I have to pare the edges, but I also had to pare the joint so the material would fit into the groove. I  was able to do this by first drawing a line where the grooves would be. Then, placing a brush handle under the line and running my paring knife along it. This removed a small amount of the leather, and gave me a guide to work from. I pared the rest thin using a scalpel.

Wednesday, June 16, 2010

Mylar Envelope

Besides the codex, we also encounter pamphlets, limp paper bindings, newspapers, etc. Sometimes these materials have some damage, but do not warrant intensive repair. In those cases, we can often provide support by encapsulation in a Mylar envelope. This envelope enables you to view the materials, remove them for handling, and keeps them protected and flat (with a 20 or 40 point board for support).
This particular book was stapled at the spine. The staples had rusted away, but the pages were still collated and in tact. The book had also been stored folded.
I cut a piece of board to the exact size of the book, and constructed the Mylar envelope. I began by folding a piece of Mylar in half and sharpening the fold with a bone folder. I put this fold into the mounting press. Then I used the crisp edge to cut the next side. I put the book and board between the Mylar sheets to measure the final side (the thickness of the materials must be accounted for). After removing the object, I cut and pressed the third side. The forth side was also trimmed, but left open so the object can be removed. This is the end result.

Thursday, June 10, 2010

Recent Rebacks

These are two cloth rebacks I completed simultaneously. Thankfully for both books the sewing was in tact. This first book's covers were detached, the end papers were delaminating, the spine round was askew, and the first three pages were loose.
I started by tipping in the loose pages with wheat starch paste. Then I pasted out and lined the spine, with Japanese tissue and linen. When both linings were dry, I gently hammered the spine to fix the round. Then I proceeded with a reback repair as usual. This is the end result.
This is the second book.

Sunday, June 6, 2010

The Thread That Binds - Design Binding

For The Bone Folder's 2010 Bind-o-rama, the text block chosen was The Thread That Binds. I worked on this design in my book binding class. I decided to sew the text block on raised cords. The signatures were very thick, so I decorated the edge with speckled blue acrylic. The leather I had to work with was a thick, gray, morocco grain. For a color scheme, I decided to go with gray and blue. I sewed the text block with blue thread (so it would show on the exposed cords), and sewed blue and gray end bands. For the boards, I glued pieces of mat board together. This provided me with the thickness I needed to match the leather, and was easily shaped by sanding. (I had to angle the boards to be thinner at the spine, so that book could open easily). I attached these boards to the text block by fraying and pasting out the cord on them.
I pared the leather and cut away the middle with a circle cutter. I also attached this with paste, leaving extra material out at the turn in to construct the head/tail cap. Then I infilled the covers, glued down the paste papers and trimmed the turn ins. For the joint, I pared two strips of the same leather thin and pasted them down, overlapping slighting on the text block and on to the board. When those dried, I rubbed them down flush with a bone folder at the spine, then infilled the boards and cut sheets of gray Roma for the end papers. The board sheet was glued down directly on the covers. The fly sheet however, was glued onto the text block using just a thin bead of PVA along the spine and fore-edge. Finally, I painted the exposed area of the spine to match the paste paper.

Thursday, June 3, 2010

Leather Reback - Quarter Bound

This is another book from the Syracuse University Ranke Collection that was a good candidate for rebacking. The sewing was completely intact (on raised cords), but the leather at the spine and joint was delaminated.

I was able to remove most the leather from the spine dry, and applied a thin layer of methyl cellulose to remove the rest. Then, I pasted out the spine, and lined it with Japanese tissue. While that dried, I cut strips of linen to be glued down between the cords. Then, I resewed the end bands.
Using a scalpel, I cut along where the leather meets the paper on the boards. I removed the old leather, and lifted the paper slightly. I also lifted the endpapers at the corners and at the spine, for the turn ins. (I also put some brown Morike underneath the lifted paper for support. The paper was brittle and kept breaking. Adding the Morike enabled me to handle it without causing more damage). I measured and cut the new leather and prepared it by paring, dampening with a sponge, pasting it out, and allowing it to sit for the paste to soak in. Then I reattached the boards by gluing out the linen strips and bringing them on to the board. I trimmed the linen so it only overlapped by about half an inch. Then I cut two strips of 10 point board, the exact distance from the spine edge of the board to about 1mm before the paper. This makes the transition between the new and old materials smoother. After gluing down the 10 point strips, I attached the new leather to the corners, and put some silicon release paper between the board and text block. Then I attached the new spine leather, running a bone folder along the cords to accentuate them, and leaving enough material at the turn in to construct the head/tail caps. I wrapped a piece of cord around the joint, and put the book in a press to dry.

Saturday, February 6, 2010

Limp Leather Long Stitch Binding

I was recently given some upholstery leather and wanted to find a way to use it. The leather was chrome tanned. This means the leather would be incredibly difficult to par and it's best use would be limp bindings.
To prepare the leather for a limp binding, I lined the back with paper and pressed it to ensure it dried as flat as possible. When I removed the leather, I noticed it had puckered in places from the paper shrinking. Fortunately I was able to fix this by rolling the leather. This unified the puckering and had a nice textual effect, which only worked because the leather was run through a machine at the upholstery factory. I gently sanded the leather to enhance the texture. Next, I trimmed the leather to the height I wanted, leaving the fore edge a little longer to trim later. Then I creased the area for the spine with a bone folder and cut slits for the sewing. Finally, I attached the text block and trimmed the fore edge. This is the end result (2010).

Wallpaper Samples - Part 2 - Wet Board Removal

As previously mentioned, the wallpaper samples I have been working on had two distinct adhesives, spray mount adhesive and gelatin paste. The spray mount could be removed dry by splitting the backing board. I tried to split the board on the samples with gelatin pastes, but the board did not cooperate. I could not get the bone folder between the layers. After struggling with this for a little while, I decided to try wet removal (which is how I identified the gelatin adhesive).
On the first sample, after I had partially removed some board with the bone folder, I dampened the back of the board using a sponge and a spray bottle. When the board was damp, I was able to roll it off in small amount with my thumb. With additional moisture, this proved more successful and I was able to remove board all the way down to the back of the paper. At this point, I decided to try soaking the sample. I spot tested the inks and when they proved water stable, I moved the sample to a warm water bath (supported by Reemay) and soaked the sample for about 10 minutes. Then I removed the sample, flipped the tray and used it to support the sample so that I could work on it over the sink. I was able to sufficiently  remove the board by rolling my thumb over the surface and picking up the final pieces with a spatula. When all the board was removed, I pasted out the sample on a piece of Mylar and lined it with Japanese tissue. Then I dried it between Reemay and blotting paper under weight.
These images show a sample before treatment, after wet removal of the board, and with an untrimmed Japanese tissue lining.
 
This process took longer, but the end result was much cleaner. I was able to remove ALL the board, unlike with the dry removal. And the risk of skinning the paper is greatly reduced as the adhesive gives.

Thursday, February 4, 2010

Wallpaper Samples - Part 1 - Dry Board Removal

I recently began a new project dealing with hand painted wallpaper samples from the late 19th century. There were twenty-eight samples in total, in a variety of sizes. All of them had been mounted to boards, but with two different adhesives. Some were attached to just a backing board with a gelatin paste, and others were matted and attached to a backing board with spray mount adhesive. There was also a variety of damage to the samples. ranging from creasing to tears to large sections missing. Because space in the lab was limited, I divided the samples into four groups (based on level of damage) so I could removed them from the stacks in smaller increments.The ultimate goal for these samples was to remove the acidic backing boards and line with Japanese tissue for stability, then construct a box to house the collection.
As previously stated, there were two distinctly different adhesives which led to two different methods of removing the board. Fortunately for those that were matted, the mat boards were cut larger than the backing board and taped together on the back. Because there was not adhesive between the sample and the mat, I was able to simply remove the tape on the back and thus remove the mat. I found a surprise in one of these worth photographing.
Because the spray mount adhesive was not water soluble, I had to remove the backing board dry. I did this using a shaped bone folder. I removed the board slowly, in layers. Luckily these boards split easily. I continued removing layers until I was as close as I could comfortably get to the paper. Some areas lifted clean away from the paper without fuss. For the areas where the board was well and truly stuck, I used the bone folder to gently scrape and the surface and thin the board down to the last layer before the paper, and left it. Forced removal would skin the paper. The following picture shows this process about halfway through, and the tool used.
When the backing board was sufficiently removed, I pasted out the wallpaper on a sheet of Mylar and lined it with Japanese tissue. I dried the samples between Reemay and blotting paper under weight to keep them flat.
I did have some minor issues on the first couple samples with skinning the paper. After I began to get the hang of it, I realized this was because I was trying to take off too much backing board at once. I also found that when I was down to the last few layers, the thinner I could get the board, the easier it came away from the paper.
In the next parts I will discuss my wet board removal method, and how I treated the missing pieces on damaged samples.