A blog about bookbinding, book conservation, artist's books, printmaking and interning.
Showing posts with label magnesium bicarbonate. Show all posts
Monday, July 19, 2010
Encapsulation and Screw Post Binding (2)
This book required a lot of attention. The original binding was two industrial staples, which had rusted and broken away from several pages. The pages had secured in their original positions using pressure sensitive tape (scotch tape). The pages were also terribly brittle. It would have been impossible to touch this book without causing more damage to the pages.
My first step was to remove all the pressure sensitive tape. Luckily, most of the original adhesive had deteriorated, and it came off easily. Next, I collated and pulled the book. Once I had all the pages separated, I placed them between Reemay and washed them. Twice in a warm water bath, and once with magnesium bicarbonate to act as a buffer.
Even after washing/deacidifying, the paper was still to brittle to guard and resew. So, I opted for encapsulation. This would enable the pages to be handled, and help prevent further damage. I encapsulated each page in Mylar, and bound them as a screw post binding.
These are pictures of the end result.
Wednesday, May 12, 2010
Tape Removal - Music Book
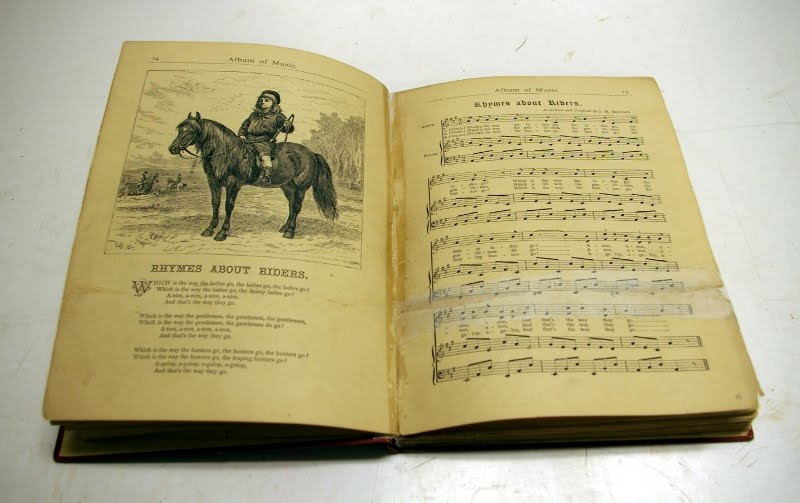
This book's sewing had broken in several places and the signatures were being held together with pressure sensitive tape. The case was detached, but in good shape.
I began by removing all the tape with a tacking iron and spatula. In several areas, the plastic carrier from the tape had dried and fallen off, leaving behind only the adhesive residue. I was able to remove most of this using ethyl alcohol and a cotton swab. When I had all the signatures loose, I washed the book between Reemay. First, in more alcohol to help reduce the tape staining and open the fibers. Then in water twice and Magnesium Bicarbonate [Mg2(CO3)2]. These pictures show the water washes one (top) and two (bottom). As you can see, a lot was removed.
When the sheets were dry, I guarded the loose leaves back together and repaired damaged pages with Japanese tissue and heat set tissue. Then I resewed the text block (two on) and lined the spine with Japanese tissue and linen. I repaired the case by lining Japanese tissue behind the original spine and adding a blotting paper stiffener. I also put PVA in the bumped corners and more Japanese tissue on the corners and endcaps, where the cloth was damaged. I rehung the boards using the linen spine lining, then covered the hinge with a strip of Japanese tissue. These are pictures of the end result.
I began by removing all the tape with a tacking iron and spatula. In several areas, the plastic carrier from the tape had dried and fallen off, leaving behind only the adhesive residue. I was able to remove most of this using ethyl alcohol and a cotton swab. When I had all the signatures loose, I washed the book between Reemay. First, in more alcohol to help reduce the tape staining and open the fibers. Then in water twice and Magnesium Bicarbonate [Mg2(CO3)2]. These pictures show the water washes one (top) and two (bottom). As you can see, a lot was removed.
When the sheets were dry, I guarded the loose leaves back together and repaired damaged pages with Japanese tissue and heat set tissue. Then I resewed the text block (two on) and lined the spine with Japanese tissue and linen. I repaired the case by lining Japanese tissue behind the original spine and adding a blotting paper stiffener. I also put PVA in the bumped corners and more Japanese tissue on the corners and endcaps, where the cloth was damaged. I rehung the boards using the linen spine lining, then covered the hinge with a strip of Japanese tissue. These are pictures of the end result.
Thursday, March 25, 2010
Wet Cleaning and Report
I was going through my old pictures and realized I had not yet posted any wet cleaning of books. Since this particular book belongs to me, I wrote a treatment report for it. I will post that with pictures instead of the usual format.
Title: Alice in Wonderland – Carroll Date Completed: August 2009
Format: Book
Material: Cloth Time: 28 hours
Binding: Full
Condition: Text block was originally perfect bound, but the adhesive had delaminated in spots, causing the text block to be split into several “sections.” The text block was completely detached from the front cover. Pages were yellow with acid and incredibly brittle. Almost every page was torn or creased, with pieces missing. A few pages were missing entirely. Covers were in surprisingly good condition, with the exception of a piece missing from the spine. There were a few cracks in the cloth, but the spine was still attached, joints were not too worn and corners were not bumped.
Treatment: Pages were separated from text block on by one and placed between sheets of Reemay. Once all the pages were separated, they were soaked in cold, filtered water for 20 minutes. The initial pH of the paper was 3.5, so after a water bath, the pages were soaked in Magnesium Bicarbonate [Mg(HCO3)2] for an additional 30 minutes. The pages, attached to the Reemay, were then hung to remove excess liquid, pressed between blotting paper, and dried on the drying rack. The pH after washing was 6.5. Once dried, all pages were aligned and inspected for damage. Missing pages were replaced with acid-free Dove Grey paper and repairs were made with heat-set tissue. The pages were then divided into signatures of six and guarded with Japanese tissue (via wheat starch paste). When all sections were attached (sewn one on) and aligned, they were nipped in the press to reduce swell. Using pre-punched holes, the text block was sewn with tapes. A toned, linen lined, handmade paper endsheet was sewn in to replace the missing endpapers in the front. The spine was then lined with Japanese tissue (via wheat starch paste), head and tail bands were attached, and then the spine was lined with linen (via PVA) and rounded. The endsheets were lifted on the covers, and the original spine lining was removed, and then replaced with Japanese tissue and 10 pt board. The text block was re-attached to the boards by gluing the tapes and linen down under the lifted endsheets. The missing piece on the spine was replaced with Morike and toned with acrylics. The small cracks in the cover were repaired with Japanese tear strips, and also toned.
Notes: Despite de-acidification, the pages remained terribly brittle. Some pages tore slightly during sewing, and it reached the point where continued repair with heat-set tissue was not worth the value of the book. Had this been a more prestigious book, the pages might have been individually lined with a very thin Japanese tissue for support. But this particular book was not worth such efforts.
Images:
Treatment Report
Title: Alice in Wonderland – Carroll Date Completed: August 2009
Format: Book
Material: Cloth Time: 28 hours
Binding: Full
Condition: Text block was originally perfect bound, but the adhesive had delaminated in spots, causing the text block to be split into several “sections.” The text block was completely detached from the front cover. Pages were yellow with acid and incredibly brittle. Almost every page was torn or creased, with pieces missing. A few pages were missing entirely. Covers were in surprisingly good condition, with the exception of a piece missing from the spine. There were a few cracks in the cloth, but the spine was still attached, joints were not too worn and corners were not bumped.
Treatment: Pages were separated from text block on by one and placed between sheets of Reemay. Once all the pages were separated, they were soaked in cold, filtered water for 20 minutes. The initial pH of the paper was 3.5, so after a water bath, the pages were soaked in Magnesium Bicarbonate [Mg(HCO3)2] for an additional 30 minutes. The pages, attached to the Reemay, were then hung to remove excess liquid, pressed between blotting paper, and dried on the drying rack. The pH after washing was 6.5. Once dried, all pages were aligned and inspected for damage. Missing pages were replaced with acid-free Dove Grey paper and repairs were made with heat-set tissue. The pages were then divided into signatures of six and guarded with Japanese tissue (via wheat starch paste). When all sections were attached (sewn one on) and aligned, they were nipped in the press to reduce swell. Using pre-punched holes, the text block was sewn with tapes. A toned, linen lined, handmade paper endsheet was sewn in to replace the missing endpapers in the front. The spine was then lined with Japanese tissue (via wheat starch paste), head and tail bands were attached, and then the spine was lined with linen (via PVA) and rounded. The endsheets were lifted on the covers, and the original spine lining was removed, and then replaced with Japanese tissue and 10 pt board. The text block was re-attached to the boards by gluing the tapes and linen down under the lifted endsheets. The missing piece on the spine was replaced with Morike and toned with acrylics. The small cracks in the cover were repaired with Japanese tear strips, and also toned.
Notes: Despite de-acidification, the pages remained terribly brittle. Some pages tore slightly during sewing, and it reached the point where continued repair with heat-set tissue was not worth the value of the book. Had this been a more prestigious book, the pages might have been individually lined with a very thin Japanese tissue for support. But this particular book was not worth such efforts.
Images:
These images show the book before treatment. Notice the breaks in the text block.
This is a pictures show the washing process, including the initial submerge in the bath (top), the amount of acid washed out with soaking (below), and a method of hanging the leaves to dry (bottom).
These are after images. I received a lot of brownie points for getting the text block back in the case without rebacking it. I was just lucky, considering I had to guard every folio for sewing.
Monday, December 21, 2009
Encapsulation/Screw Post Binding
Encapsulation is an excellent treatment for fragile materials which will be handled frequently. Most commonly at Syracuse, this is done for newspapers. This particular newspaper was a Japanese-American Publication during World War II. The paper was highly acidic and brittle. Most of the original folds had become splits. Some pages were still attached, and had to be split for the encapsulation.* My first step was to go through the pages and number them with pencil in an inconspicuous place. Next, I washed the pages, between Reemay, in filtered water and deacidified them using magnesium bicarbonate (Mg(HCO3)2), then dried the pages on blotting papers. When the pages were dried, I repaired any large tears with heat set tissue.
The next step was to make the Mylar sleeves which would support the pages. To do this, I measured the pages, multiplied the width by about 2.5, plus extra space needed for the spine piece (approximately 2"). I also added about 2" to the length. Then I folded the Mylar in half, using a bone folder to get a crisp edge, and put this edge in the heating press for about 4 seconds. This welds the Mylar together, and it is critical the the edges are flush. Therefore, when the first edge is sealed, the Mylar is taken to the board shear and the next edge is trimmed (using the welded edge to make a right angle) and welded. After this was done, I put a page from the newspaper inside the Mylar to determine the squares, making sure the spine edge was NOT welded. Once I was pleased with the placement of the page, I trimmed and welded the third side (with the page inside the Mylar). I repeated this process for all the pages, and then punched holes (carefully positioned to be visually pleasing) on the spine side of the Mylar.
When all the pages are encapsulated, I measured and cut board for the covers. This is two large covers and three small strips for the "U" shaped spine. My spine pieces were 2 - height x 3/4" and 1 - h x 1/4". Covering these pieces is tricky because you need to account for the board thickness. The best way to do this is to glue one strip down (green) and then glue out the middle piece (blue), butt it against the other piece and wrap the book cloth around. This way when the middle piece sticks to the cloth, it will pull away from the other piece and leave the correct space for the board thickness. Adjust the distance slightly to account for two cloth thicknesses. Then just glue the third piece on the same distance apart.
Also the corners of the book cloth for the spine piece should be as follows:
When the "U" piece and covers are covered with book cloth (and end sheets on the covers), I drilled holes through them with the Dremel drill to match the holes punched in the Mylar sleeves. Finally, I attached everything with screws and posts (Fall 2009).
Monday, November 30, 2009
Recasing
Occasionally in the library, I encounter books with covers so badly damaged it is easier (and cheaper) to recase the text block than to mend the original covers. Recasing is also a treatment option for damaged books that are not especially valuable.
This is an example of a book I recased. It was originally a quarter bound leather, tight backed (fastback), with marble paper covered boards. The paper was torn and faded with dirt and age. The spine had completely delaminated and split off the front board (Top). Delamination at the spine also caused the text block to split (Bottom).
I decided to mimic the original case design with a quarter binding in PC4 paper. I cut the boards to fit, attached the PC4 spine and trimmed the PC4 to be even and straight on both covers. Next, I covered the remainder of the boards with book cloth. Then I trimmed the turn-ins, infilled the boards, and attached the text block. After pressing the book with jointing boards, I attached the labels, which were pre-coated with Klucel G to prevent the ink from smearing (Summer 2009).
The above image on the left shows the finished product and the right depicts the stability of the text block after treatment. The below images are additional before and after examples of recased books. These book were bound entirely in book cloth (2008).
This is an example of a book I recased. It was originally a quarter bound leather, tight backed (fastback), with marble paper covered boards. The paper was torn and faded with dirt and age. The spine had completely delaminated and split off the front board (Top). Delamination at the spine also caused the text block to split (Bottom).
I started by removing the cover. I pressed the sections of the text block together between boards, and cleaned the spine with methyl cellulose to removed the old liner and adhesive. The sewing was cut in several places, so I had to pull the text block apart. I washed and deacidified the sections in filtered water and magnesium bicarbonate [Mg2(CO3)2]. After the pages dried, I repaired damaged areas with heat set tissue, and guarded each section using wheat starch paste and Japanese tissue. I realigned the signatures, resewed the text block, adding dove gray endpapers and lined the spine with Japanese tissue. The addition of materials from guarding caused swell in the spine, so I rounded it to reduce this swell.
I decided to mimic the original case design with a quarter binding in PC4 paper. I cut the boards to fit, attached the PC4 spine and trimmed the PC4 to be even and straight on both covers. Next, I covered the remainder of the boards with book cloth. Then I trimmed the turn-ins, infilled the boards, and attached the text block. After pressing the book with jointing boards, I attached the labels, which were pre-coated with Klucel G to prevent the ink from smearing (Summer 2009).
Subscribe to:
Posts (Atom)