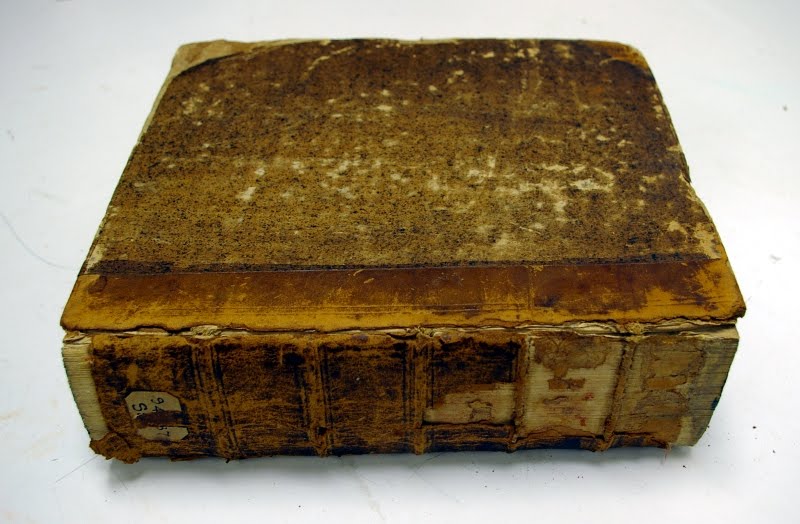
This was a book from the Ranke collection at Syracuse. The spine was deteriorating and the boards were detached. It was not a good candidate for rebinding because of the level of tooling on the boards. The boards were also wooden, which is not common, and therefore should be preserved. This was the original condition of the book.
I cleaned the spine with methyl cellulose and lined it with Japanese tissue and linen. I made some page repairs with heat set tissue, and resewed the end bands. I lifted the original leather at the spine and corners, attached new, and repaired missing areas or cracks with Japanese tissue. Finally, I toned the tissue to match and applied a coat of SC 6000. This is the end result.
Note: For this particular book, the SC 6000 was a mistake. It caused the tissue areas to shine more than the original leather surface, even after a coating of Klucel G. I would advise against the use of SC 6000 if the original material had lost sheen or if the repaired area is very large.
A blog about bookbinding, book conservation, artist's books, printmaking and interning.
Showing posts with label goat leather. Show all posts
Sunday, September 5, 2010
Monday, August 9, 2010
Ranke Rebind
I found this book in the Ranke collection, in Special Collections at Syracuse University. Both joints were broken and the boards loose. The leather was missing at the corners and what remained appeared to be only the flesh side.
I soaked the front board in a warm water bath to float off the original book plates. While that soaked, I scraped the old leather off the spine with a cobbler's knife. I covered the spine with methyl cellulose to remove excess glue or linings. Then I lined the spine with Japanese tissue and linen, and added new end bands and end papers. I cut new boards, and sanded them down to fit against the shoulder. I attached them to the text block with the linen lining. Then I cut a new piece of leather for the spine, and parred the edges. I attached this leather to the spine with paste, as a tight back. After gluing down the turn-ins, I constructed head caps and pressed the book overnight.
Once the new leather was set, I trimmed what overlapped onto the boards and then infilled the board with 10 pt. Next, I covered the board with paste paper, overlapping slightly on the leather. When the paste paper was dry, I trimmed the turn-ins and infilled the inside of the boards. Finally, I glued down the end papers and reattached the original book plates with paste. This was the end result.
Wednesday, June 23, 2010
German Springback
I have made one German style Springback before, and decided to make another, smaller one. Following these instructions, I made this.
Note: Because my Springback was bound in leather, not only did I have to pare the edges, but I also had to pare the joint so the material would fit into the groove. I was able to do this by first drawing a line where the grooves would be. Then, placing a brush handle under the line and running my paring knife along it. This removed a small amount of the leather, and gave me a guide to work from. I pared the rest thin using a scalpel.
Labels:
adhesive,
bone folder,
book binding,
book conservation,
codex,
conservation,
end bands,
goat leather,
leather,
minature,
paring
Thursday, June 3, 2010
Leather Reback - Quarter Bound
This is another book from the Syracuse University Ranke Collection that was a good candidate for rebacking. The sewing was completely intact (on raised cords), but the leather at the spine and joint was delaminated.
I was able to remove most the leather from the spine dry, and applied a thin layer of methyl cellulose to remove the rest. Then, I pasted out the spine, and lined it with Japanese tissue. While that dried, I cut strips of linen to be glued down between the cords. Then, I resewed the end bands.
Using a scalpel, I cut along where the leather meets the paper on the boards. I removed the old leather, and lifted the paper slightly. I also lifted the endpapers at the corners and at the spine, for the turn ins. (I also put some brown Morike underneath the lifted paper for support. The paper was brittle and kept breaking. Adding the Morike enabled me to handle it without causing more damage). I measured and cut the new leather and prepared it by paring, dampening with a sponge, pasting it out, and allowing it to sit for the paste to soak in. Then I reattached the boards by gluing out the linen strips and bringing them on to the board. I trimmed the linen so it only overlapped by about half an inch. Then I cut two strips of 10 point board, the exact distance from the spine edge of the board to about 1mm before the paper. This makes the transition between the new and old materials smoother. After gluing down the 10 point strips, I attached the new leather to the corners, and put some silicon release paper between the board and text block. Then I attached the new spine leather, running a bone folder along the cords to accentuate them, and leaving enough material at the turn in to construct the head/tail caps. I wrapped a piece of cord around the joint, and put the book in a press to dry.
I was able to remove most the leather from the spine dry, and applied a thin layer of methyl cellulose to remove the rest. Then, I pasted out the spine, and lined it with Japanese tissue. While that dried, I cut strips of linen to be glued down between the cords. Then, I resewed the end bands.
Using a scalpel, I cut along where the leather meets the paper on the boards. I removed the old leather, and lifted the paper slightly. I also lifted the endpapers at the corners and at the spine, for the turn ins. (I also put some brown Morike underneath the lifted paper for support. The paper was brittle and kept breaking. Adding the Morike enabled me to handle it without causing more damage). I measured and cut the new leather and prepared it by paring, dampening with a sponge, pasting it out, and allowing it to sit for the paste to soak in. Then I reattached the boards by gluing out the linen strips and bringing them on to the board. I trimmed the linen so it only overlapped by about half an inch. Then I cut two strips of 10 point board, the exact distance from the spine edge of the board to about 1mm before the paper. This makes the transition between the new and old materials smoother. After gluing down the 10 point strips, I attached the new leather to the corners, and put some silicon release paper between the board and text block. Then I attached the new spine leather, running a bone folder along the cords to accentuate them, and leaving enough material at the turn in to construct the head/tail caps. I wrapped a piece of cord around the joint, and put the book in a press to dry.
Subscribe to:
Posts (Atom)