
Thursday, March 25, 2010
Wet Leather
I came across this book on the end processing cart at S.U. (For those who don't know, the end processing cart is books for special collections which come to the lab for book plates or repair before becoming available to the public). Leather can be wet during the binding process. In fact, you want it to be so that it is flexible and will stretch tight on the book. After it has been bound and on the shelf for a while, this is what happens when water is introduced. (The white you see is a Japanese tear strip for a hinge repair).


Friday, February 12, 2010
Wallpaper Samples - Part 3- Finishing Touches
Most of the wallpaper samples were intact, but there were a few with large areas missing. I tried two different treatment methods for these large areas. The first, and simplest was to simply replace the missing area with a similarly colored Morike. I would attach the Morike with paste before adding the Japanese tissue lining to the sample. Then I trimmed the Morike with the lining so it was flush. This is an example of this method.




The second method was to apply a thin Japanese tissue to the top of the sample, barely overlapping, with paste. Then tone the tissue with acrylics. (I think watercolor is generally more appropriate for this type of repair, but acrylic is all I had available. Therefore, I ensured this additional Japanese tissue layer could be removed, even after toning, by testing it on a small area. As long as the acrylic is not painted over the tissue edge, there should be no damage to the sample). I used this method sparingly because it was time consuming, difficult to match colors/patterns, and often unnecessary for the size of the missing area. These are two samples for which I did tone.


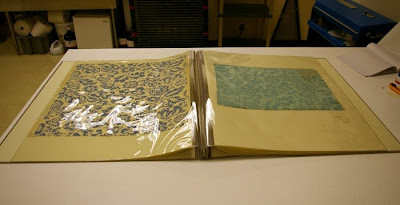
After all the samples were treated, I made labels for each and interleaved sheets of Dove Gray, due to the variation in size. Finally, I encapsulated the samples in polyester film (Mylar) and constructed a screw-post binding (2010).

Saturday, February 6, 2010
Limp Leather Long Stitch Binding
I was recently given some upholstery leather and wanted to find a way to use it. The leather was chrome tanned. This means the leather would be incredibly difficult to par and it's best use would be limp bindings.
To prepare the leather for a limp binding, I lined the back with paper and pressed it to ensure it dried as flat as possible. When I removed the leather, I noticed it had puckered in places from the paper shrinking. Fortunately I was able to fix this by rolling the leather. This unified the puckering and had a nice textual effect, which only worked because the leather was run through a machine at the upholstery factory. I gently sanded the leather to enhance the texture. Next, I trimmed the leather to the height I wanted, leaving the fore edge a little longer to trim later. Then I creased the area for the spine with a bone folder and cut slits for the sewing. Finally, I attached the text block and trimmed the fore edge. This is the end result (2010).

To prepare the leather for a limp binding, I lined the back with paper and pressed it to ensure it dried as flat as possible. When I removed the leather, I noticed it had puckered in places from the paper shrinking. Fortunately I was able to fix this by rolling the leather. This unified the puckering and had a nice textual effect, which only worked because the leather was run through a machine at the upholstery factory. I gently sanded the leather to enhance the texture. Next, I trimmed the leather to the height I wanted, leaving the fore edge a little longer to trim later. Then I creased the area for the spine with a bone folder and cut slits for the sewing. Finally, I attached the text block and trimmed the fore edge. This is the end result (2010).

Wallpaper Samples - Part 2 - Wet Board Removal
As previously mentioned, the wallpaper samples I have been working on had two distinct adhesives, spray mount adhesive and gelatin paste. The spray mount could be removed dry by splitting the backing board. I tried to split the board on the samples with gelatin pastes, but the board did not cooperate. I could not get the bone folder between the layers. After struggling with this for a little while, I decided to try wet removal (which is how I identified the gelatin adhesive).
On the first sample, after I had partially removed some board with the bone folder, I dampened the back of the board using a sponge and a spray bottle. When the board was damp, I was able to roll it off in small amount with my thumb. With additional moisture, this proved more successful and I was able to remove board all the way down to the back of the paper. At this point, I decided to try soaking the sample. I spot tested the inks and when they proved water stable, I moved the sample to a warm water bath (supported by Reemay) and soaked the sample for about 10 minutes. Then I removed the sample, flipped the tray and used it to support the sample so that I could work on it over the sink. I was able to sufficiently remove the board by rolling my thumb over the surface and picking up the final pieces with a spatula. When all the board was removed, I pasted out the sample on a piece of Mylar and lined it with Japanese tissue. Then I dried it between Reemay and blotting paper under weight.
These images show a sample before treatment, after wet removal of the board, and with an untrimmed Japanese tissue lining.


 This process took longer, but the end result was much cleaner. I was able to remove ALL the board, unlike with the dry removal. And the risk of skinning the paper is greatly reduced as the adhesive gives.
On the first sample, after I had partially removed some board with the bone folder, I dampened the back of the board using a sponge and a spray bottle. When the board was damp, I was able to roll it off in small amount with my thumb. With additional moisture, this proved more successful and I was able to remove board all the way down to the back of the paper. At this point, I decided to try soaking the sample. I spot tested the inks and when they proved water stable, I moved the sample to a warm water bath (supported by Reemay) and soaked the sample for about 10 minutes. Then I removed the sample, flipped the tray and used it to support the sample so that I could work on it over the sink. I was able to sufficiently remove the board by rolling my thumb over the surface and picking up the final pieces with a spatula. When all the board was removed, I pasted out the sample on a piece of Mylar and lined it with Japanese tissue. Then I dried it between Reemay and blotting paper under weight.
These images show a sample before treatment, after wet removal of the board, and with an untrimmed Japanese tissue lining.


Thursday, February 4, 2010
Wallpaper Samples - Part 1 - Dry Board Removal
I recently began a new project dealing with hand painted wallpaper samples from the late 19th century. There were twenty-eight samples in total, in a variety of sizes. All of them had been mounted to boards, but with two different adhesives. Some were attached to just a backing board with a gelatin paste, and others were matted and attached to a backing board with spray mount adhesive. There was also a variety of damage to the samples. ranging from creasing to tears to large sections missing. Because space in the lab was limited, I divided the samples into four groups (based on level of damage) so I could removed them from the stacks in smaller increments.The ultimate goal for these samples was to remove the acidic backing boards and line with Japanese tissue for stability, then construct a box to house the collection.
As previously stated, there were two distinctly different adhesives which led to two different methods of removing the board. Fortunately for those that were matted, the mat boards were cut larger than the backing board and taped together on the back. Because there was not adhesive between the sample and the mat, I was able to simply remove the tape on the back and thus remove the mat. I found a surprise in one of these worth photographing.

 When the backing board was sufficiently removed, I pasted out the wallpaper on a sheet of Mylar and lined it with Japanese tissue. I dried the samples between Reemay and blotting paper under weight to keep them flat.
I did have some minor issues on the first couple samples with skinning the paper. After I began to get the hang of it, I realized this was because I was trying to take off too much backing board at once. I also found that when I was down to the last few layers, the thinner I could get the board, the easier it came away from the paper.
In the next parts I will discuss my wet board removal method, and how I treated the missing pieces on damaged samples.
As previously stated, there were two distinctly different adhesives which led to two different methods of removing the board. Fortunately for those that were matted, the mat boards were cut larger than the backing board and taped together on the back. Because there was not adhesive between the sample and the mat, I was able to simply remove the tape on the back and thus remove the mat. I found a surprise in one of these worth photographing.

Because the spray mount adhesive was not water soluble, I had to remove the backing board dry. I did this using a shaped bone folder. I removed the board slowly, in layers. Luckily these boards split easily. I continued removing layers until I was as close as I could comfortably get to the paper. Some areas lifted clean away from the paper without fuss. For the areas where the board was well and truly stuck, I used the bone folder to gently scrape and the surface and thin the board down to the last layer before the paper, and left it. Forced removal would skin the paper. The following picture shows this process about halfway through, and the tool used.

I did have some minor issues on the first couple samples with skinning the paper. After I began to get the hang of it, I realized this was because I was trying to take off too much backing board at once. I also found that when I was down to the last few layers, the thinner I could get the board, the easier it came away from the paper.
In the next parts I will discuss my wet board removal method, and how I treated the missing pieces on damaged samples.
Thursday, January 28, 2010
First Design Binding - The Martian Chronicles
I decided I wanted to experiment with design binding. I went through my bookshelf looking for a good candidate and came across The Martian Chronicles by Ray Bradbury. I removed the original covers, endpapers and the mull one the spine. The book was perfect bound and the spine was slightly rounded. Because of this I did not want to cut and rebind the text block out of fear I would loose a substantial amount of the margins. Instead I left the spine intact, lined it with linen (PVA) and gently hammered it to accentuate the round. Next I attached new end sheets and hand sewn head and tail bands. For the case, I decided to do a quarter leather with paste paper and leather onlays. The running theme was Mars-esque colors - brown, red, orange, etc.
The piece I choose for the spine had a great triangular shape on one edge, which I cleaned up and decided to incorporate into my design. I started by paring the turn-ins of the leather, cutting my boards to size, and back cornering the boards slightly. Then I began to attach the spine. First I pasted out the leather and let it sit to absorb the moisture. Next I placed the text block (with boards in position) into a finishing press, leaving enough of the spine edge out to work with. I removed the excess paste from the leather, attached the spine stiffener, and positioned it on the book, ensuring the spine stiffener was in the proper location. Then I rubbed the leather down on the boards, removed the book carefully from the press and did the turn-ins. I left a little extra sticking up at each turn-in for the head and tail caps, which I constructed by gently dragging the case along the bench. I tried string around the spine (in the joint) and left the cover to dry.
To make the onlays, I pared 1" strips of leather very thin, then pasted them together on a piece of Mylar. When I was happy with the placement. I removed the mylar and lined the back with Japanese tissue and put the leather in a press. When it had dried, I cut circles out of visually interesting areas, and saved them for my cover design.
When the leather on the spine had dried, I infilled the boards with blotting paper (to absorb some of my onlays), then attached the paste paper, slightly overlapping the leather. After this was pressed and dried, I added my onlays and pressed the book again, putting circles cut from folder stock over the onlays to force them down into the blotter. Finally, I stamped the cover and cased in the book. These are pictures of the finished product (2010).


The piece I choose for the spine had a great triangular shape on one edge, which I cleaned up and decided to incorporate into my design. I started by paring the turn-ins of the leather, cutting my boards to size, and back cornering the boards slightly. Then I began to attach the spine. First I pasted out the leather and let it sit to absorb the moisture. Next I placed the text block (with boards in position) into a finishing press, leaving enough of the spine edge out to work with. I removed the excess paste from the leather, attached the spine stiffener, and positioned it on the book, ensuring the spine stiffener was in the proper location. Then I rubbed the leather down on the boards, removed the book carefully from the press and did the turn-ins. I left a little extra sticking up at each turn-in for the head and tail caps, which I constructed by gently dragging the case along the bench. I tried string around the spine (in the joint) and left the cover to dry.
To make the onlays, I pared 1" strips of leather very thin, then pasted them together on a piece of Mylar. When I was happy with the placement. I removed the mylar and lined the back with Japanese tissue and put the leather in a press. When it had dried, I cut circles out of visually interesting areas, and saved them for my cover design.
When the leather on the spine had dried, I infilled the boards with blotting paper (to absorb some of my onlays), then attached the paste paper, slightly overlapping the leather. After this was pressed and dried, I added my onlays and pressed the book again, putting circles cut from folder stock over the onlays to force them down into the blotter. Finally, I stamped the cover and cased in the book. These are pictures of the finished product (2010).


Sunday, January 17, 2010
Rebacking Experiment
Rebacking cloth bindings is a relatively common repair, with several variations in treatment technique. For this reason, I decided to experiment with two different methods by experts in the field. Using instructional manuals, I completed two cloth rebacks in the style of Don Etherington and Dominic Riley.
To begin I choose a set of two books from the stacks, which were identical in size, thickness, and required the same level of treatment.
 The first step in each method was the same. I separated the text block from the case, cleaned and lined the spine with Japanese tissue (paste), and trimmed the boards (just a hair) at the joint edge. Next, I attached the head and tail bands to both books and lined the spine with linen (PVA), using aeroplane linen on the Etherington volume because it is what he advocates. With the linen lining providing extra stability, I repaired broken sewing in both volumes. At this point, both methods advise attaching a spine lining of "thickish" paper, the exact height of the text block. I used 10 pt board (PVA), dampening the strip for the Etherington volume as advised.
The next step in Riley's manual is to repair the corners, using wheat starch paste, and dry them under pressure from a bull dog clip (I used clothes pins). I typically use PVA for corner repairs, so I treated the Riley covers as directed and left the Etherington (to be treated with PVA) for comparison. Then I lifted the cloth and endpapers on both books. As advised in the manual, for the Etherington volume, I removed excess board fibers by lining the lifted area with masking tape, pressing down, and pulling it off. This does remove a good amount of unnecessary board.
With the text block and covers prepped, I began constructing the new spine pieces. This was really the biggest difference between the two. Riley suggests using toned cloth, sized with methyl cellulose. For this is used linen, and toned with an acrylic/cellulose mix. Then I attached a spine stiffener of 10 pt board. Etherington prefers to use Japanese tissue. He suggests using morike of a similar color, lined with linen, and coated with Klucel G. I had to tone the morike available slightly, so I used an acrylic/Klucel mix. For this spine stiffener, I used blotting paper, because Etherington claims it is easier to shape (which proved true). I parred the edges on both spine pieces to reduce bumps under the cover cloth.
 When the spine pieces were ready, I cased in each volume. Both advocate attaching the new spine piece first. Riley's detailed instructions were very helpful for this part. He suggests positioning the boards and then moving the book to a press, sticking out enough to have room to freely move the lifted cloth (The ploy-press was very handy for this part). Next, I glued out the cloth (making sure no adhesive got on the spine stiffener) and positioned it on the text block, with the stiffener was in the correct position. With the spine piece in place, I removed the book from the press, and glued down the turn-ins. Then I attached the case by drawing the linen over the joint, with the cover raised by boards and weights keeping the book in position (as seen below in my Reattaching a Text Block entry).
Etherington suggests casing-in a similar way, except he attaches the Japanese tissue to one cover first. Next he attaches the spine stiffener in the necessary position and trims the second edge of the Japanese tissue spine piece to fit in position on the second cover. I opted to attached the spine stiffener first and trim the morike to size, so the spine piece could be parred.
The finishing steps for both volumes are gluing down the endpapers and cloth, reattaching remaining original spine pieces, and toning with acrylic. This is the completed set (vol. I - Etherington, vol. II - Riley):
 My reason for this experiment was to learn variations of cloth reback repairs, and develop a personal preference. I really liked Riley's method, and have used it since. I was taught to attach the text block to the covers first, then add the spine piece. I feel working on the case first is faster, and I like the end result better. However, I do prefer to use morike lined with linen for the spine piece, because it is easier to work with and to tone.
I was also interested in the difference between the paste (Left) and PVA (Right) corners. The corners repaired with paste and held with clothes pins dried perfectly flat, while the PVA corners remained slightly curved. The only problem is the paste took a long time to dry. I think whether this additional time is worth while will depend on the book (2010).

To begin I choose a set of two books from the stacks, which were identical in size, thickness, and required the same level of treatment.

The next step in Riley's manual is to repair the corners, using wheat starch paste, and dry them under pressure from a bull dog clip (I used clothes pins). I typically use PVA for corner repairs, so I treated the Riley covers as directed and left the Etherington (to be treated with PVA) for comparison. Then I lifted the cloth and endpapers on both books. As advised in the manual, for the Etherington volume, I removed excess board fibers by lining the lifted area with masking tape, pressing down, and pulling it off. This does remove a good amount of unnecessary board.
With the text block and covers prepped, I began constructing the new spine pieces. This was really the biggest difference between the two. Riley suggests using toned cloth, sized with methyl cellulose. For this is used linen, and toned with an acrylic/cellulose mix. Then I attached a spine stiffener of 10 pt board. Etherington prefers to use Japanese tissue. He suggests using morike of a similar color, lined with linen, and coated with Klucel G. I had to tone the morike available slightly, so I used an acrylic/Klucel mix. For this spine stiffener, I used blotting paper, because Etherington claims it is easier to shape (which proved true). I parred the edges on both spine pieces to reduce bumps under the cover cloth.

Etherington suggests casing-in a similar way, except he attaches the Japanese tissue to one cover first. Next he attaches the spine stiffener in the necessary position and trims the second edge of the Japanese tissue spine piece to fit in position on the second cover. I opted to attached the spine stiffener first and trim the morike to size, so the spine piece could be parred.
The finishing steps for both volumes are gluing down the endpapers and cloth, reattaching remaining original spine pieces, and toning with acrylic. This is the completed set (vol. I - Etherington, vol. II - Riley):

I was also interested in the difference between the paste (Left) and PVA (Right) corners. The corners repaired with paste and held with clothes pins dried perfectly flat, while the PVA corners remained slightly curved. The only problem is the paste took a long time to dry. I think whether this additional time is worth while will depend on the book (2010).

Manuals used:
Repairing an Original Cloth Case Binding - Don Etherington
The Art and Science of Cloth Rebacking: Some Useful Techniques Shared - Dominic Riley
Subscribe to:
Posts (Atom)